In the world of video content creation, stability and comfort can make the difference between amateur-looking footage and professional-grade productions. Shoulder rig kits have emerged as essential tools for filmmakers, vloggers, and content creators who need reliable camera support during extended shooting sessions. These versatile systems distribute the weight of your camera setup across your shoulder and body, allowing for smoother shots and reducing fatigue during long takes.
As content creation becomes increasingly competitive, creators are seeking equipment that not only improves their production quality but is also practical and user-friendly. Modern shoulder rig kits address this need perfectly by offering modular designs that are straightforward to assemble without requiring extensive technical knowledge. Whether you’re shooting documentaries, interviews, weddings, or YouTube content, investing in a quality shoulder rig kit can dramatically elevate your video production value while making the filming process more comfortable and efficient. The right rig transforms handheld shooting from a shaky, tiring experience into a stable, professional operation that lets you focus on capturing compelling content.
Understanding Shoulder Rig Kits
A shoulder rig kit is a camera support system designed to rest on your shoulder, providing stability and weight distribution during handheld filming. Unlike tripods that keep your camera stationary or gimbals that use motorized stabilization, shoulder rigs offer a middle ground that combines mobility with natural stabilization through body contact. The system typically features a padded shoulder mount, adjustable rods, handles, and mounting plates that work together to create a stable platform for your camera.
For content creators, shoulder rigs represent a practical solution to one of filmmaking’s most persistent challenges: maintaining steady footage while moving. The design leverages your body’s natural stability, transforming you into a human tripod that can walk, pivot, and adjust angles fluidly. This becomes particularly valuable when shooting in dynamic environments where traditional support equipment would be impractical or restrictive. Documentary filmmakers appreciate the mobility, while wedding videographers value the ability to capture intimate moments without intrusive equipment. The rig’s contact points with your body create multiple stabilization zones, significantly reducing the micro-shakes and jitters that plague purely handheld shooting. As cameras and lenses have become lighter yet more capable, shoulder rigs have evolved to accommodate everything from compact mirrorless setups to more substantial cinema camera configurations, making professional-quality stabilization accessible to creators at all levels.
Benefits of Using Shoulder Rig Kits
The primary advantage of shoulder rig kits lies in their ability to dramatically improve footage stability without sacrificing mobility. When you’re filming handheld, even the steadiest hands produce micro-movements that become glaringly obvious in the final footage. A shoulder rig absorbs these tremors through multiple contact points with your body, resulting in noticeably smoother shots that appear more professional. This stability improvement becomes especially apparent during walking shots or when following moving subjects, where the rig’s weight distribution helps maintain consistent framing.
Beyond stabilization, these systems significantly reduce physical fatigue during extended shooting sessions. Holding a camera at eye level for hours strains your arms, shoulders, and back, but a shoulder rig redistributes that weight across your entire upper body. Wedding videographers and documentary filmmakers who regularly shoot for eight-hour days find this ergonomic benefit invaluable, as it allows them to maintain focus on creative decisions rather than physical discomfort. The reduced strain also means steadier footage toward the end of long shoots when arm fatigue would otherwise compromise quality.
Shoulder rigs also enhance your creative flexibility by enabling smooth camera movements that would be difficult to achieve otherwise. The natural pivot point created by the shoulder mount allows for fluid panning and tilting motions that feel organic rather than mechanical. You can transition seamlessly from static shots to dynamic movements, following action naturally while maintaining professional-looking stability. This versatility makes shoulder rigs particularly valuable for run-and-gun shooting situations where you need to adapt quickly to unfolding scenes without the time to set up more complex stabilization equipment.
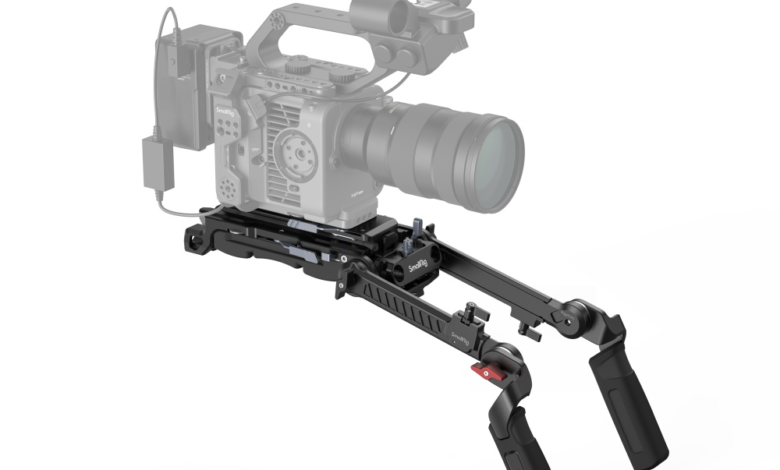
Key Components of a Shoulder Rig Kit
Understanding the essential components of a shoulder rig kit helps you make informed decisions and ensures your setup functions optimally. The shoulder pad forms the foundation of the system, providing the primary contact point with your body. Quality pads feature dense foam cushioning covered in durable materials that prevent slipping during movement. This component bears most of your camera’s weight, so adequate padding directly impacts comfort during extended shoots.
The baseplate serves as the mounting platform where your camera attaches to the rig. Most baseplates include quick-release mechanisms that let you detach your camera rapidly when you need to switch between handheld and rig-mounted shooting. They typically feature multiple threaded mounting points for accessories and should align with your camera’s center of gravity to maintain proper balance. Rod systems extend forward from the baseplate, creating the framework for mounting additional accessories like follow focus units, matte boxes, or external monitors. These rods come in standard diameters, with 15mm being most common for lighter setups and 19mm for heavier professional configurations.
Handles constitute another critical component, providing control points for maneuvering your rig. Dual handles positioned forward of the camera give you leverage for smooth panning and tilting movements while maintaining stability. Many systems include adjustable handles that accommodate different shooting styles and body positions. Some rigs also incorporate counterweights that attach to the rear, balancing heavier lens configurations and preventing front-heavy setups that strain your shoulder. Together, these components create a modular system that adapts to various shooting scenarios while maintaining the stability and comfort that make shoulder rigs valuable tools for content creators.
Comparing Shoulder Rig Kits to Cage rigs
While both shoulder rigs and cage rigs serve as camera support systems, they address fundamentally different shooting needs. Cage rigs prioritize compactness and accessory mounting, wrapping around your camera body to create a framework with multiple attachment points for monitors, microphones, and other gear. They’re designed primarily for handheld shooting or mounting on gimbals and tripods, offering minimal stabilization on their own. The cage simply provides structure and protection while keeping your setup relatively compact.
Shoulder rigs, in contrast, focus specifically on weight distribution and body-contact stabilization. Their extended design with shoulder pads and forward handles creates a larger footprint but delivers superior stability for handheld work. This makes shoulder rigs ideal for documentary-style shooting, event coverage, and any scenario requiring extended handheld operation. Cage rigs excel when you need a minimal profile with maximum accessory flexibility, particularly for gimbal work or tight shooting spaces where a shoulder rig’s bulk would be problematic. Many professional creators actually use both systems complementarily, mounting a caged camera onto a shoulder rig for the ultimate combination of accessory versatility and ergonomic stability. Your choice depends on whether your priority is compact versatility or extended handheld comfort and stabilization.
Choosing the Right Shoulder Rig Kit
Selecting the appropriate shoulder rig kit begins with honestly assessing your camera setup’s weight and size. Measure your camera body with the heaviest lens you regularly use, plus any essential accessories like external recorders or monitors. This total weight determines the rig’s construction quality you’ll need—lighter mirrorless setups under five pounds can work with aluminum rigs, while heavier cinema cameras exceeding ten pounds require robust steel or reinforced designs. Matching your rig’s capacity to your actual gear prevents both overspending on unnecessarily heavy systems and the frustration of underpowered rigs that flex under load.
Your shooting style should directly influence your choice. Event videographers who move constantly through crowds benefit from compact designs with minimal forward projection, while documentary filmmakers might prioritize extended rod systems that accommodate follow focus and matte box configurations. Consider how often you’ll need to transition between rig-mounted and handheld shooting—frequent switchers should prioritize quick-release baseplates that detach in seconds. The handle configuration matters too; dual front handles provide maximum control for deliberate movements, while single-handle designs offer faster mobility for reactive shooting situations.
Budget considerations extend beyond the initial purchase price. Modular systems with standard rod diameters and universal mounting points let you expand gradually, adding accessories as your needs evolve. This approach proves more economical than buying a complete premium system upfront when you’re still developing your shooting style. Check whether the rig accommodates your existing accessories or requires proprietary components that lock you into one manufacturer’s ecosystem. Manufacturers like SmallRig offer modular shoulder rig systems with standardized mounting points that work with various camera brands and accessories, providing flexibility as your setup evolves. Reading reviews from creators working in your specific genre provides practical insights that specifications alone can’t convey, revealing real-world durability and comfort issues that only emerge during extended use.
Setting Up Your Shoulder Rig Kit
Begin by laying out all components on a clean workspace and identifying each part according to your kit’s instruction manual. Start with the baseplate, which forms the core of your system. Attach it to your camera’s tripod mount, ensuring the quick-release plate locks securely—give it a firm tug to confirm it won’t detach unexpectedly during shooting. Position the baseplate so your camera’s weight centers over the mounting point, preventing front or rear bias that creates instability. Most baseplates have adjustment slots that let you slide the camera forward or backward until you find the optimal balance point.
Next, insert the rod system into the baseplate’s rod clamps, making sure both rods sit at equal heights and parallel to each other. Tighten the clamps firmly but avoid overtightening, which can damage aluminum rods. Slide the shoulder pad assembly onto the rods, positioning it at a comfortable distance behind your camera—typically twelve to eighteen inches works for most users, though taller shooters may prefer more distance. The pad should align naturally with your shoulder when you hold the front handles. Attach the handles to the forward portion of the rods, spacing them shoulder-width apart for comfortable grip and natural arm positioning.
With the basic structure assembled, fine-tune the setup by shouldering the rig and checking comfort and balance. Adjust the shoulder pad position until the weight distributes evenly without tilting forward or backward. The camera’s viewfinder or monitor should align naturally with your eye level when the pad rests comfortably on your shoulder. Make small adjustments to handle positions, testing different angles until you can operate camera controls without straining your wrists. If your kit includes counterweights, add them incrementally to the rear until heavy lenses no longer pull the rig forward. Finally, attach essential accessories like monitors or microphones, placing heavier items closer to the center of gravity to maintain balance. Test the complete setup with a few practice shots, making final tweaks before your actual shoot to ensure everything feels natural and secure.
Common Mistakes to Avoid
One of the most frequent errors creators make is neglecting proper balance adjustment before shooting. Many users mount their camera and immediately start filming without testing weight distribution, resulting in a front-heavy or rear-heavy rig that causes shoulder strain and unstable footage. Always spend five minutes adjusting the baseplate position and adding counterweights as needed until the rig feels neutral when shouldered. This simple step prevents fatigue and significantly improves your footage quality throughout the day.
Another common mistake involves overtightening or undertightening component connections. Overtightened rod clamps can damage aluminum components and make future adjustments difficult, while loose connections create unwanted movement and rattling during shooting. Tighten each connection firmly until secure, then give it a quarter-turn more—no further. Test your assembled rig with vigorous shaking to identify any loose parts before your shoot begins.
Many creators also make the error of adding too many accessories without considering cumulative weight and balance. Each monitor, microphone, and accessory shifts your center of gravity and increases fatigue. Evaluate whether each accessory is truly essential for your specific shoot, and position heavier items closer to the camera body rather than at the rod ends where they create leverage that amplifies instability. Starting minimal and adding components only as needed keeps your rig manageable and your footage steady.
Elevate Your Video Production with Shoulder Rigs
Shoulder rig kits represent a practical investment for content creators seeking to elevate their video production quality without the complexity of advanced stabilization systems. Throughout this guide, we’ve explored how these versatile tools provide superior stability through body-contact design, reduce physical fatigue during extended shoots, and enable creative camera movements that would otherwise require expensive equipment. Understanding the key components—from shoulder pads and baseplates to rod systems and handles—empowers you to build a setup tailored to your specific shooting style and camera configuration.
The comparison between shoulder rigs and cage rigs clarifies that each system serves distinct purposes, with shoulder rigs excelling at extended handheld work where comfort and stability matter most. By choosing the right kit based on your camera weight, shooting style, and budget, then assembling it with proper balance and avoiding common mistakes like neglecting weight distribution or overloading accessories, you position yourself to capture professional-grade footage consistently. Whether you’re documenting events, creating YouTube content, or filming independent projects, a well-configured shoulder rig kit transforms challenging handheld shooting into a manageable, professional operation that lets your creative vision shine through stable, compelling footage.